


News & Exhibitions
Latest Factory Updates, Industry Trends & Global Exhibition Information
How to prevent glue bleed-through when bonding thin wood veneer
To prevent glue bleed-through when bonding thin wood veneer, control the amount and flow of adhesive before changing press pressure. Use an adhesive intended for veneer pressing, apply a measured, even film, and keep assembly time, temperature, and pressure within its working requirements. Increasing pressure can force excess glue through pores or small checks, while reducing glue too far can leave a weak bond.
Reliable wood veneer bonding requires enough adhesive to wet the mating surfaces without leaving a surplus that can migrate to the face. Thin, open-grained, or checked veneer makes that balance harder to maintain. A clean-looking panel straight from the press is only part of the assessment: glue contamination may become obvious when stain or finish is applied.
Check whether the defect is actually glue bleed-through
Bleed-through occurs when adhesive travels from the bond line through the veneer and reaches the exposed surface. It may appear as hard specks in pores, glossy patches, or areas that absorb stain differently. Glue can also travel through splits and joints, producing narrow lines rather than broad patches.
Similar marks can come from glue transferred by dirty gloves, contaminated cauls, or a roller touching the veneer face. These problems need better handling and cleaning rather than a different pressing cycle.
Inspect a rejected panel under angled light and compare the marks with the grain, joints, and application pattern:
- Marks following pores or small checks: investigate adhesive penetration, veneer condition, and excessive spread.
- Repeated bands: inspect roller condition, spreader adjustment, and overlapping application passes.
- Fingerprints or isolated smears: check handling surfaces, gloves, and stacking practices.
- Lines at veneer joints: inspect joint fit and local glue accumulation.
Do not assume every dark patch is adhesive. Moisture differences and natural wood variation can also change appearance. Comparing the defect with an unbonded offcut helps avoid changing a sound process for the wrong reason.
Match the adhesive to the veneer and pressing method
A general-purpose woodworking glue may bond solid wood successfully yet be difficult to control beneath a delicate decorative veneer. Choose an adhesive whose technical instructions cover the intended veneer application, substrate, and hot- or cold-press process. Its spread rate, assembly window, and curing requirements should provide the starting settings.
Viscosity matters because a freely flowing adhesive can enter pores and checks readily. However, choosing the thickest glue available is not a reliable solution. An adhesive that does not wet the substrate or transfer properly to the veneer can produce dry areas and poor adhesion. Solids content and curing behavior also affect how the glue performs.
When different adhesive options make sense
A formulated cold-press veneer adhesive can be appropriate for an unheated press or vacuum setup when its instructions cover those conditions. Some formulations are designed to limit bleed-through, but they still require controlled application. A hot-press adhesive needs a suitable temperature and curing schedule; substituting it into a cold process can leave an inadequately cured bond.
A different adhesive chemistry may help when the existing glue cannot provide both a clean face and adequate bonding. That change should also account for mixing accuracy, pot life, cleanup, handling precautions, and compatibility with the intended finish. A cleaner surface alone does not establish that the replacement is suitable.
Do not add water to improve spreading unless the adhesive instructions permit it. Dilution changes more than application feel: it can increase penetration and alter drying or curing behavior. Avoid improvised fillers or thickeners for the same reason.
Measure glue spread instead of judging it by appearance
An uneven coating can cause bleed-through in one area and a weak bond nearby. Operators may then increase the overall spread to eliminate dry spots, making the overloaded areas worse. Correct the distribution before increasing the quantity.
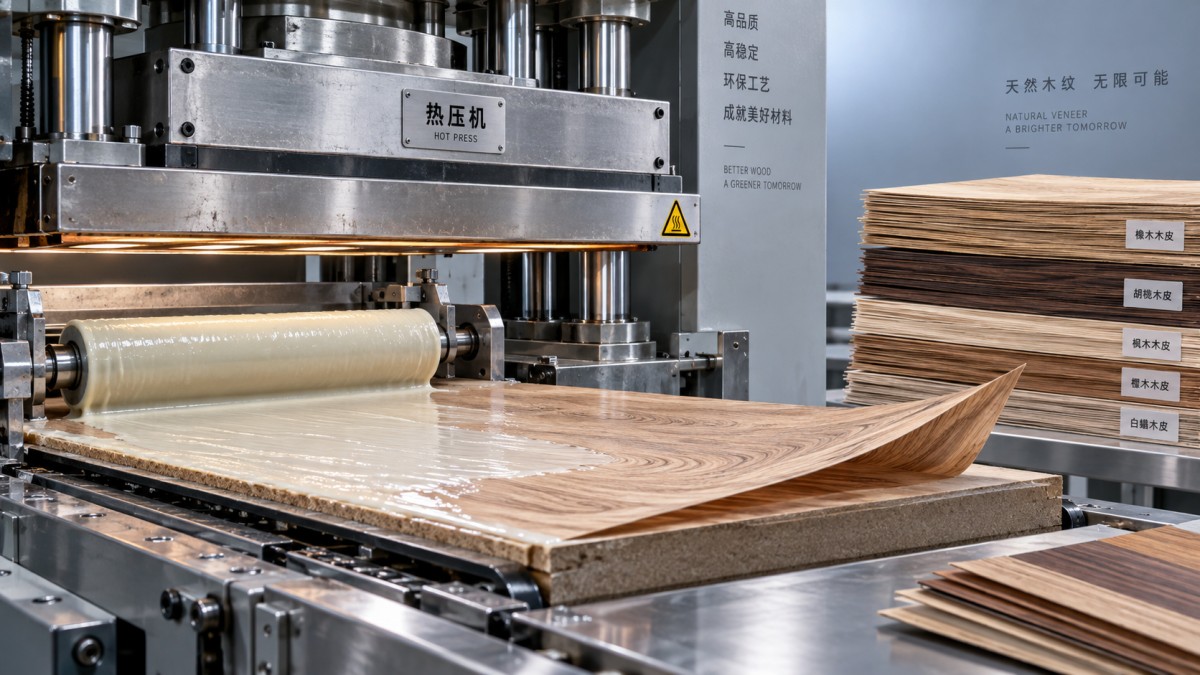
For many veneer pressing processes, applying glue to the substrate makes the film easier to control and reduces direct wetting of the loose veneer. Follow the adhesive instructions if they require a different application method. Use a suitable roller or calibrated spreader, and avoid puddles at edges, corners, and roller overlap lines.
A practical check is to weigh a known-area substrate coupon before and immediately after application. The mass difference divided by the coated area gives the wet spread rate. Compare it with the adhesive’s specified range. Weighing promptly limits error from moisture loss.
Use several coupons to check distribution across the working width. An acceptable average can conceal a heavy band on one side of a roller. Inspect for dried glue, worn surfaces, uneven roller gaps, and contamination that creates streaks.
The target is a continuous bond line within the adhesive’s application range. A nearly transparent coat is not automatically correct, and a visibly wet coat is not automatically excessive. Adhesive color, substrate absorption, and lighting make appearance an unreliable measurement.
Look for penetration paths in the veneer and substrate
Thin veneer offers a short path from the glue line to the face. Open pores, small splits, and slicing checks can make penetration easier. Hold representative sheets against a light source to identify pinholes and open defects before bonding. Highly figured or fragile sheets deserve separate trials rather than being treated like a previously successful veneer.
Keep veneer and substrate in a stable environment before assembly. Large moisture differences can contribute to movement, uneven wetting, or pressing problems. Where moisture is measured, use equipment and methods suitable for the material; a reading from the underlying stack may not represent an individual thin sheet.
The substrate should be flat, clean, and free of loose dust. Local depressions can hold extra adhesive, while high spots can concentrate pressure. A rough or unusually absorbent board may also change the amount of glue available at the bond line.
If the substrate absorbs glue rapidly, simply adding more adhesive may create new problems beneath porous veneer. Review substrate preparation and adhesive suitability together. Any sizing or sealing treatment must be compatible with the bonding system; an improvised coating can weaken adhesion.
Backed veneer or a suitable barrier construction may be worth considering when a particularly porous face cannot be bonded cleanly with the current system. This changes the construction and may affect thickness, flexibility, and processing requirements, so it needs its own bonding trial.
Set pressure and heat as a coordinated process
Pressure brings the veneer into contact with the substrate and holds it there during cure. Excess pressure can drive surplus adhesive into openings or compress delicate wood. Insufficient pressure can leave gaps, blisters, and weak areas. Correct spread and flat materials make the required pressure easier to establish.
Distinguish hydraulic gauge pressure from pressure on the panel. The gauge describes the hydraulic system; panel pressure depends on the machine’s force conversion and loaded area. Changing panel size or the loading arrangement can therefore change the pressure applied to the workpiece even when the gauge setting stays the same. Use the machine’s pressure-setting method for the actual load.
Flat, clean cauls and maintained platens help distribute force consistently. A suitable release sheet can protect the press surfaces, but it does not stop adhesive traveling through the veneer. Wrinkled sheets, trapped debris, and damaged cauls can introduce additional surface defects.
For heated production, Qingdao Zhongding Machinery Co., Ltd.’s Hot Press Machine provides hydraulic pressing and electrically heated platens using conduction oil, with configurations offering one to four working layers. These features are relevant when a veneer adhesive requires controlled heat and pressure. The working recipe still needs to match the adhesive, panel construction, and loading arrangement.
Heat affects both adhesive flow and cure. During warming, some adhesives become more mobile before they set, so increasing temperature is not a universal remedy for bleed-through. Likewise, shortening the cycle because the face appears dry can leave the bond insufficiently cured. The platen setting is not the same as the temperature reached inside the bond line.
Keep the interval between spreading, layup, and full pressing consistent. Pressing immediately may allow a very mobile adhesive to penetrate; waiting too long may prevent proper transfer after a skin forms. Work within the specified assembly window rather than deliberately waiting for the glue to become tacky unless the process calls for it.
Use a controlled trial before releasing production
Test the actual veneer, substrate, adhesive, and finish combination. A dense offcut does not represent a porous decorative sheet, and a small coupon may not reproduce the loading delay or temperature behavior of a full panel.
- Record the starting conditions. Include material identification, adhesive mix where applicable, measured spread, assembly time, panel loading, pressure setting, temperature, and press duration.
- Correct obvious variation. Clean the spreader, remove glue accumulations, and check layup timing before changing the recipe.
- Change one factor at a time. If spread is excessive, bring it into the specified range while keeping other conditions stable. Record the result.
- Check face appearance and bond quality. After the required cure or conditioning period, inspect for contamination and use an appropriate destructive check on sacrificial material to reveal unbonded areas.
- Apply the intended finish. Use the planned sanding, staining, and coating sequence on a sample. A raw panel can hide glue-related finishing defects.
When a coupon succeeds, confirm the settings on a representative production-size panel. Include normal loading time and panel placement. For a multi-opening press, check whether panels loaded early and late receive comparable assembly times and pressing conditions.
If bleed-through has already occurred
Separate affected panels before sanding or finishing. Thin veneer provides little material for correction, and aggressive sanding can cut through the face before removing glue lodged in deeper pores.
For isolated surface deposits, a carefully controlled scraping operation may remove raised adhesive after it has reached the appropriate state. Test on scrap first. Water or solvent wiping can spread contamination, raise grain, or affect the bond, depending on the adhesive; it should not become an automatic cleanup method.
Where glue has penetrated deeply, replacement may be more reliable than repair. Before resuming production, retain a defective sample, identify the likely migration path, and repeat the bonding trial with measured spread and documented press settings. Release the process only when the panel has both an acceptable bond and a clean appearance under the intended finish.
Send Your Inquiry
We welcome your cooperation and we will develop with you.