


News & Exhibitions
Latest Factory Updates, Industry Trends & Global Exhibition Information
Hydraulic Composers Explained: Pressing Force, Alignment, and Cycle Control
A press can apply enough force to close a glued panel and still produce a weak, twisted, or uneven assembly. The usual problem is not simply “too little pressure.” In a woodworking hydraulic composer, bonding quality depends on three controls working together: the pressing force must suit the joint and material, the parts must be held in alignment while force rises, and the cycle must give the adhesive enough time under stable conditions.
This becomes visible when an assembled door frame comes out with a step at one joint, a laminated component springs back after release, or glue lines look starved in one area and open in another. The practical answer is to set force from the bonding requirement rather than the cylinder’s maximum rating, establish alignment before loading pressure, and use a repeatable sequence of closing, pressing, holding, and releasing. A Woodworking Hydraulic Composer is most reliable when treated as a controlled assembly system rather than a machine that merely squeezes parts together.
What the hydraulic composer is controlling
A hydraulic composer is generally used to bring multiple wood parts, laminated sections, or framed components into a defined position and hold them while adhesive develops sufficient bond strength. Cylinders convert hydraulic pressure into linear clamping force. Vertical, horizontal, or side-pressure devices may act together depending on the machine layout and the part being assembled.
The frame supplies the reference geometry. Press beams, pressure pads, stops, and locating fences transfer force to the workpiece. The hydraulic circuit determines how smoothly that force builds and how consistently it is maintained. None of these elements can compensate fully for a poorly prepared workpiece. Parts that are warped, cut out of square, excessively rough, or coated with uneven glue will remain difficult to compose correctly.
The word “force” is often used loosely, but an operator should separate three related conditions:
- System pressure: the pressure indicated in the hydraulic circuit.
- Cylinder force: the pushing force generated by a cylinder at that system pressure.
- Pressure at the joint: the effective force distributed across the actual contact area of the assembled workpiece.
A high gauge reading does not automatically mean that every joint receives appropriate pressure. Pad size, part shape, contact area, clamp location, and material variation all influence how the load reaches the glue line.
Pressing force: enough to close the joint, not enough to crush it
The purpose of pressing force is to bring mating surfaces into intimate contact and hold them there without damaging the wood fibers, deforming a profile, or forcing out so much adhesive that the bond line is weakened. The correct setting depends on the adhesive supplier’s instructions, substrate density, joint design, surface preparation, moisture condition, and assembly geometry.
Operators sometimes increase hydraulic pressure after seeing an open joint. That can be the right response only when the parts are correctly machined and the press is applying force in the correct direction. If a component has a bow, a shoulder is out of square, or a stop is preventing full seating, additional force may lock the defect into the assembly. It can also create internal stress that appears after the part leaves the press.
Signs that force is too low
Insufficient force may leave visible gaps, inconsistent glue transfer between mating surfaces, or joints that shift slightly during the hold period. On wide assemblies, one side may close while another remains open because the pressure pad is not centered or does not cover the area evenly. A part may look acceptable immediately after removal but open later when handling exposes inadequate contact.
Signs that force is too high
Excessive pressure can produce heavy glue squeeze-out, crushed edge grain, dented veneer, distorted rails, or a visible step where one part has been pushed past its intended position. Thin components and profiled parts are especially vulnerable because the pressure is concentrated over a small area. Excess force is also a warning sign when a machine operator is trying to overcome an alignment or machining issue.
Start from the adhesive specification and the press manufacturer’s operating guidance. Then verify the result with real production checks: look for continuous joint closure, inspect glue squeeze-out for consistency rather than volume alone, and check parts after the adhesive has reached the handling condition specified for the process. Change one relevant setting at a time. Raising pressure, extending hold time, and changing glue spread simultaneously makes it difficult to identify what corrected or caused the problem.
Alignment must be established before the cylinders load the part
Hydraulic force is powerful but not selective. A cylinder pushes wherever its pad contacts the workpiece. Without reliable locating surfaces, the assembly can slide, rotate, or climb as pressure rises. This is why alignment is not a final inspection item; it is a condition created at loading.
Before a production run, inspect the stops, fences, reference blocks, and pressure pads. They should be clean and free of hardened adhesive, wood chips, or protective packing fragments. Even a small buildup can prevent a workpiece from seating against its reference surface. Check that movable guides return to the same position and that clamping pads meet the work evenly rather than first contacting one corner.
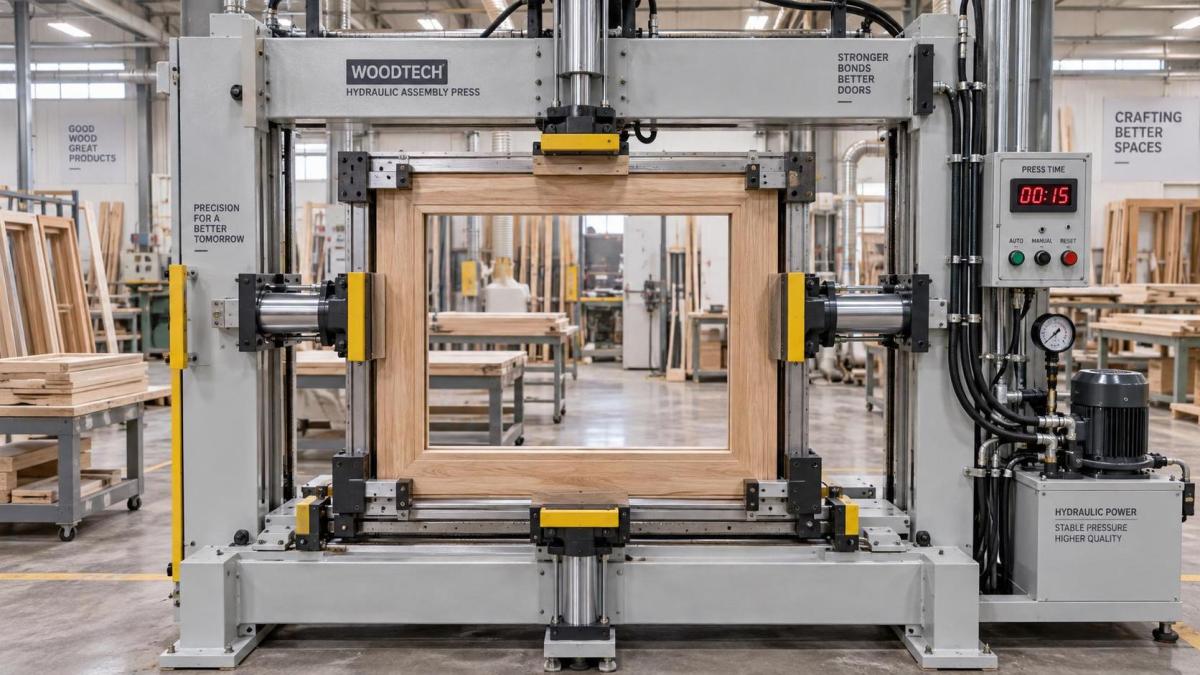
For framed doors, rails and stiles need stable reference points that control both squareness and face flushness. For laminated panels, support must prevent the stack from shifting sideways as the upper pressure beam descends. Long or flexible components may need additional support so their own weight does not create a false alignment condition before pressing begins.
Workpiece preparation affects alignment
A composer cannot make inconsistent parts become consistent simply through clamping. Confirm that mating faces are clean, machined to the required profile, and free of raised fibers or loose chips. Uneven glue application can also act like a wedge. Thick adhesive deposits in one section may hold a joint apart while another section reaches full compression.
Where parts have different thicknesses or surface profiles, use suitable cauls, backing blocks, or properly designed pads to spread load without altering the intended geometry. Any added support must be flat, stable, and positioned so it does not create a new pivot point. Soft improvised packing can hide the actual problem by compressing unpredictably from cycle to cycle.
A repeatable cycle is more valuable than a fast cycle
Cycle control determines when the press closes, how force is built, how long the work stays under pressure, and how the machine releases it. The correct sequence protects both bond development and workpiece position. In manual operation, inconsistency often comes from changing the sequence to save a few seconds: applying full pressure before checking the stops, releasing immediately after the timer ends, or unloading while the assembly is still unsupported.
A useful operating sequence is simple, but each stage has a purpose:
- Prepare and stage the parts. Confirm the correct components, adhesive condition, glue spread, and orientation before they enter the press.
- Place against the references. Seat the assembly fully against stops and supports. Check critical faces and corners before force is applied.
- Close at a controlled rate. Bring pads into contact without impact. Watch for movement, uneven closure, or a part lifting from the reference surface.
- Build to the approved pressing condition. Apply the required force gradually enough to observe whether the workpiece remains aligned.
- Hold for the defined press time. Maintain pressure for the adhesive process rather than relying on appearance alone.
- Release in a controlled manner. Sudden unloading can allow stressed components to move or can create a handling risk around the press area.
- Inspect and support after removal. Check key joints, face flushness, and squareness, then place the component where it will not be distorted during further curing.
The press time and post-press handling time are not interchangeable. An assembly can be ready to remove from the composer while still requiring careful support before machining, sanding, or transport. Follow the adhesive instructions for open time, assembly time, press time, and curing conditions. Wood temperature and shop conditions can affect how forgiving those time windows are.
Finding the source of an inconsistent assembly
When a defect appears repeatedly, inspect the process in the order that the workpiece experiences it. This prevents a hydraulic adjustment from masking a preparation problem.
Pressure loss, slow cylinder movement, unusual noise, oil leakage, or unequal travel between press points are machine conditions that require attention. Do not reach into the pressing area to reposition parts while the system is active or supported only by hydraulic pressure. Use the machine’s specified isolation and maintenance procedure before cleaning, adjustment, or inspection inside the clamping zone.
Where heated veneer pressing fits into the workflow
Not every bonding task uses the same equipment or cycle logic. A hydraulic composer is often selected for assembling components where positioning and clamp direction are the central concerns. Veneer lamination adds another major process variable: heat. When natural wood veneer is bonded to plywood, MDF, particle board, or other wood-based panels, both thermal uniformity and hydraulic pressure influence the finished surface.
For that type of operation, a Wood Veneer Hot Press Machine uses uniform heat and hydraulic pressure to support bonding between veneer and substrate. Its multi-layer pressing structure can suit workflows that need more than one panel pressed at a time. The same operating principles still apply: panels must be clean and flat, pressure must be spread evenly, and the press cycle must match the adhesive and veneer process rather than being set only for throughput.
A robust frame and reliable hydraulics help maintain repeatability, but operators should still check platen cleanliness, panel stacking order, edge support, and surface protection. Veneer defects are often visible immediately, while bond weakness may not be obvious until later handling. Avoid treating a hot press as a substitute for proper substrate preparation.
Small controls that prevent repeated rework
Record approved settings by product family rather than relying on memory. The record does not need to be complicated: identify the component type, adhesive, relevant pressure setting, press time, locating arrangement, and any required cauls or supports. This creates a useful reference when the same product returns after a changeover or when a defect must be traced.
Clean pressure pads and locating surfaces at planned intervals, especially when adhesive squeeze-out is common. Verify gauge readings and timer behavior against the machine’s intended operation. During setup, make a dry run with unglued parts when a new component shape, fixture arrangement, or pad location is introduced. That check reveals interference and alignment drift without wasting material or contaminating the press.
The most dependable result comes from keeping the sequence disciplined: prepare accurate parts, locate them positively, apply only the force required for proper contact, maintain that condition for the correct time, and inspect the first pieces before continuing the run. These controls turn hydraulic power into a repeatable assembly process rather than a source of variable pressure.
Send Your Inquiry
We welcome your cooperation and we will develop with you.