


News & Exhibitions
Latest Factory Updates, Industry Trends & Global Exhibition Information
What causes bubbles during wood veneer lamination
A veneer panel can look acceptable as it leaves the press, then show raised blisters, soft spots, or visible bubbles after cooling. In other cases, the bubble appears immediately when the veneer is trimmed or lightly pressed by hand. These defects are not merely cosmetic: they can reduce bond strength, create sanding and finishing problems, and force rework or panel rejection.
Bubbles during wood veneer lamination are usually caused by trapped air, vapor, insufficient adhesive contact, or uneven pressure across the panel. The practical solution is to identify where the bubble is located, when it appears, and whether the bond beneath it is weak. That information helps distinguish an adhesive problem from a moisture, press-setting, material, or handling problem. A properly adjusted Wood Veneer Lamination Machine helps maintain uniform pressure and controlled processing conditions, but the machine cannot compensate for unsuitable veneer, uneven substrates, or improperly prepared glue.
Start by reading the bubble pattern
The location and shape of a bubble often provide the first useful clue. Do not change adhesive, temperature, and pressure at the same time. Inspect several defective panels, mark the affected areas, and compare the pattern before making adjustments.
A bubble that can be pressed down temporarily but rises again often indicates vapor or air trapped inside the bond line. A bubble that feels loose and remains flat once pushed may point more strongly to adhesive failure. Cut a small sample from a rejected panel when possible. The appearance of the adhesive film and the fracture surface will tell far more than visual inspection alone.
Moisture imbalance is a frequent hidden cause
Wood veneer responds quickly to changes in humidity. A veneer sheet stored in a damp area may contain enough moisture to create vapor when it enters a heated press. Moisture can also move from a wet substrate, a water-based adhesive, or a recently cleaned work surface. When heat is applied, that moisture turns to vapor and seeks a path out. If the veneer and adhesive film seal the surface before vapor escapes, a blister forms.
The opposite condition can also cause trouble. Over-dry veneer may become brittle, curl at the edges, or absorb adhesive unevenly. It may pull away from the glue film during loading, leaving tiny voids that later appear as bubbles. A major difference in moisture between veneer and core material can create stress after lamination even if the initial press result looks smooth.
Condition veneer and panel substrates in a stable production environment before lamination. Keep stacks protected from direct airflow, floor moisture, and sudden temperature changes. Veneer sheets should lie flat and be allowed to acclimate rather than being taken directly from a cold, humid storage area to a heated press. Check the substrate as well, especially plywood, particleboard, MDF, and composite cores that may have been stored in different conditions.
When bubbles appear after switching veneer batches, do not assume the press settings are at fault. Compare sheet feel, curl, thickness consistency, storage history, and moisture condition. Material changes often explain why a process that worked the previous day begins producing blisters.
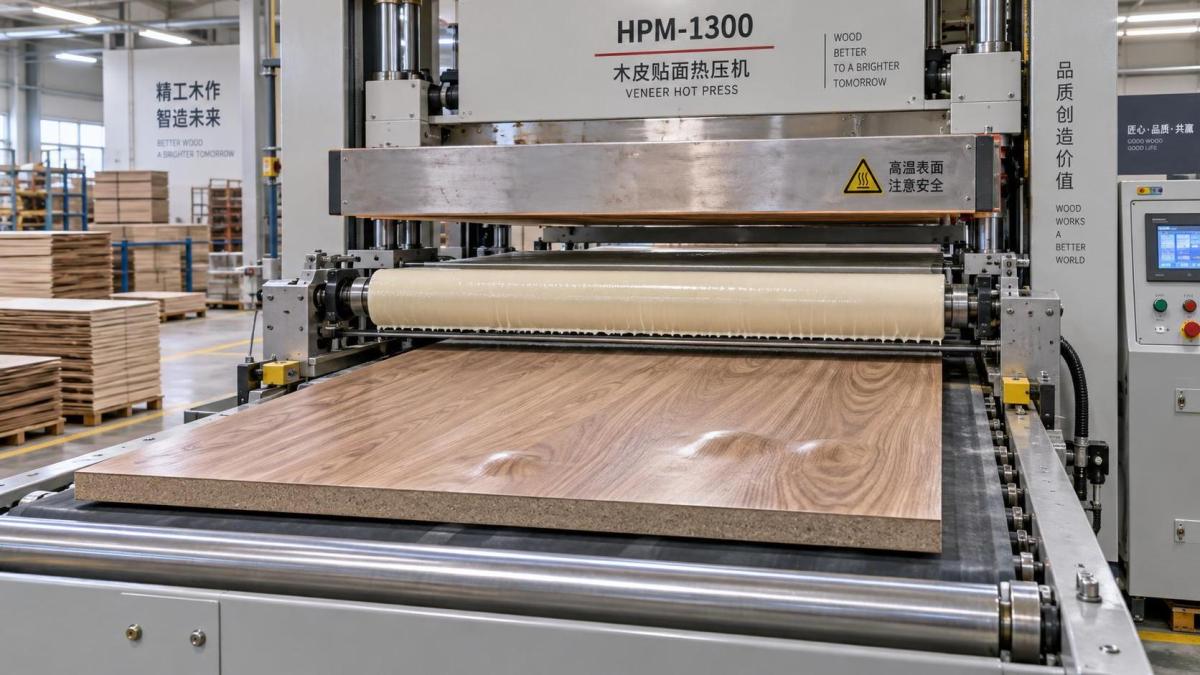
Adhesive application can create voids before the panel reaches the press
Adhesive must form a continuous, workable film between veneer and substrate. Too little glue leaves dry areas where the materials cannot make full contact. Too much glue may remain overly wet, migrate into pores, or contribute additional moisture that becomes vapor under heat. The right spread depends on adhesive type, veneer porosity, substrate absorption, press method, and production timing; there is no single amount that suits every job.
Uneven spread is especially damaging. Worn applicator rollers, blocked nozzles, contaminated spreader surfaces, and poorly set roller gaps can leave stripes of heavy and light adhesive. A panel may then bond well in one area and blister in another. Check a test panel or use a simple visual transfer check to confirm that the adhesive film is even from edge to edge.
Watch the open time, not only the glue quantity
Open time is the period between applying adhesive and closing the press. If the panel waits too long, the adhesive skin may dry before pressure is applied. The surface can look coated, but it no longer flows well enough to wet the veneer and substrate. This frequently produces localized weak bonding or dry bubbles.
Short open time can be equally problematic when panels are rushed into a press before the adhesive has spread and stabilized as intended. The result may be squeeze-out, shifting veneer, excessive moisture retention, or an uneven bond line. Temperature, airflow, adhesive formulation, and substrate absorption all change the workable time. Record the actual interval during production rather than relying only on the planned cycle.
- Confirm that the adhesive is mixed and prepared according to its supplier instructions.
- Inspect roller cleanliness and film uniformity at the start of each shift and after a stoppage.
- Keep coated panels moving consistently toward the press.
- Do not allow coated veneer to sit beneath strong airflow or heat sources.
- Compare glue spread on porous and dense veneer species; they may not behave the same way.
Uneven pressure leaves air pockets and weak contact zones
Pressure is not simply a number shown on the machine control. The important question is whether pressure reaches the entire panel evenly and remains stable long enough for the adhesive to develop a bond. Low or inconsistent pressure allows small gaps between the veneer and substrate. Air remains in those gaps, and the adhesive may not bridge them once it begins to set.
Common mechanical causes include uneven platen surfaces, damaged press pads, worn belts, contaminated caul plates, poorly supported workpieces, and panel thickness variation. A single chip, hardened glue spot, or piece of debris on a platen can prevent full contact over part of the panel. For vacuum lamination, leaks in the bag, seals, hose connections, or vacuum system can reduce compaction and leave localized bubbles.
Panels with uneven cores deserve special attention. A substrate that is bowed, rough, dented, or thickness-variable requires more compensation than a flat, calibrated panel. Flexible pads or suitable caul boards may help distribute pressure, but they must be clean, flat, and appropriate for the pressing method. Adding a pad is not a substitute for correcting severe core defects.
Verify actual contact across the work area
When a defect repeatedly occurs in the same location, test the press rather than continuing to adjust glue settings. Use an approved pressure-check method suited to the machine, inspect platen condition, and compare the affected zone with unaffected areas. On a Wood Veneer Lamination Machine, regular checks of pressure system performance, platen alignment, and operating surfaces are essential because gradual wear may not be obvious during normal production.
Also examine loading technique. Veneer must be placed without wrinkles, folds, trapped debris, or curled edges. A sheet that is pulled tight on one side and loose on the other may bridge over the surface rather than settle evenly. Light pre-positioning and careful layup reduce the chance of trapping air before the press closes.
Heat can cure the process or create steam pressure
Heated lamination requires a balance between temperature, dwell time, adhesive requirements, and the moisture content of the materials. Excessive heat may flash moisture into vapor faster than it can escape. It can also cause an adhesive surface to set prematurely, trapping gas in the bond line. Insufficient heat, by contrast, may leave certain heat-reactive adhesives under-cured, allowing bubbles or delamination to develop later.
Do not assume that the temperature displayed by the controller is identical to the temperature at the panel surface. Platen temperature, core temperature, veneer thickness, caul material, and loading frequency influence actual heat transfer. A thick or cool substrate can absorb heat rapidly, while a thin veneer may heat much faster than expected. Verify settings using a suitable measurement method during process setup, particularly after maintenance or when changing material construction.
Pressure release matters as well. Opening a hot press too abruptly can allow internal vapor to expand before the adhesive bond has stabilized. Where the adhesive system permits it, allow the panel to remain under controlled pressure for the required dwell time, then release according to the established process. Avoid immediately stacking hot panels in a way that traps heat and moisture between them.
Substrate preparation is often overlooked
Veneer cannot hide a poor bonding surface. Dust, sanding residue, oil, silicone contamination, loose fibers, and uneven machining marks all interfere with adhesive contact. Fine dust is particularly deceptive because it may not be visible after sanding, yet it creates a weak layer between glue and substrate. Clean the surface thoroughly and keep handling areas free from contamination.
Surface roughness must also be appropriate. A very rough substrate may require more adhesive to fill its texture, while an overly closed or polished surface can limit adhesive penetration and mechanical grip. The goal is a clean, consistent surface that allows controlled wetting, not maximum roughness. If bubbling is concentrated over filled areas, patched zones, knots, or repaired defects, compare their absorption and flatness with the rest of the panel.
Check veneer backs as carefully as the core. Loose dust, splits, sanding damage, taped repairs, or natural grain voids can prevent even glue contact. Thin veneer is vulnerable to glue bleed-through, but reducing glue without checking surface quality can create dry bond areas. Adjust the process based on the actual veneer and substrate combination rather than treating every sheet as identical.
A practical sequence for stopping bubbles during production
When defects begin, isolate a small number of panels and make controlled changes. Random adjustments can hide the true cause and create a different defect.
- Pause and classify the defect. Note bubble size, location, timing, and whether it appears before or after cooling.
- Inspect the failed bond. Carefully open or cut a rejected sample. Look for dry glue, wet glue, poor transfer, wood fiber tear, trapped dust, or signs of vapor.
- Check materials first. Confirm veneer and core are flat, clean, properly conditioned, and free from obvious moisture or storage issues.
- Review adhesive handling. Verify mix condition, spread consistency, working time, and whether the coating is being applied uniformly.
- Examine pressure delivery. Clean the press surfaces, inspect pads or cauls, check for recurring defect positions, and confirm the panel is supported evenly.
- Adjust one process variable at a time. Depending on the evidence, modify temperature, pressing time, pressure, or loading interval in a controlled trial.
- Allow panels to stabilize before judging. Some moisture- and heat-related bubbles appear only after cooling, so inspect samples after the normal handling period.
Keep a short production record whenever a new adhesive, veneer species, substrate, thickness, or press setup is introduced. Record the material condition, glue preparation, application method, press settings, and observed result. This is more useful than relying on memory when a similar bubble pattern returns later.
When the problem points to the machine rather than the process
Repeated defects in one fixed area, pressure that fluctuates during a cycle, uneven platen heating, recurring vacuum loss, or a press that cannot hold settings reliably should be treated as equipment inspection issues. Continuing production with unstable pressure or temperature often consumes more veneer and adhesive than a planned maintenance stop.
Routine cleaning and inspection of pressing surfaces, seals, hydraulic or pneumatic components, heating controls, rollers, and alignment points help prevent these failures. The machine should be matched to the panel size, material construction, adhesive system, and production method being used. Even a well-maintained Wood Veneer Lamination Machine needs process settings that reflect the actual materials on the line.
The most reliable way to prevent bubbles is to treat lamination as a connected process: stable materials, clean surfaces, a continuous adhesive film, correct timing, even pressure, and controlled heat. Once the bubble pattern is linked to one of these conditions, corrective action becomes much more precise and repeatable.
Send Your Inquiry
We welcome your cooperation and we will develop with you.