


News & Exhibitions
Latest Factory Updates, Industry Trends & Global Exhibition Information
What causes burn marks on a single blade rip saw for hardwood?
Dark streaks on a freshly ripped hardwood edge usually mean the blade is generating more heat than the cut can carry away. On a single blade rip saw for hardwood, the main causes are dull or resin-coated teeth, an unsuitable blade, feed that is too slow or inconsistent, and alignment problems that make the blade rub against the cut surface. Internal wood stress can also close the kerf and pinch the blade.
The pattern helps narrow the cause. Burning along nearly every board points toward tooling or machine setup; a dark patch where feeding hesitates suggests excessive contact time. Burning that appears only on particular boards may involve stress, distortion, or moisture variation. These marks create sanding or machining work, but they can also warn of binding, unstable feeding, or a developing equipment fault.
Read the burn pattern before changing settings
Keep a rejected board and mark its feed direction, reference face, and burned edge. Compare it with other pieces from the same run. Note whether the problem began after a blade change, a material change, or a feed adjustment. That information is more useful than changing several settings at once.
These patterns are clues, not proof. A dull blade can amplify a feeding problem, while misalignment can cause both burning and resin buildup. Stop cutting if stock binds, feeding becomes unstable, smoke appears, or abnormal vibration develops. Do not continue producing scrap to confirm a suspected fault.
Make inspections safe before touching the cutting system
Follow the machine’s shutdown and lockout procedure before accessing the blade, feed mechanism, pressure devices, or extraction passages. Isolate electrical power and any pneumatic or hydraulic energy as required, and verify the safe state. A stopped blade alone does not mean the machine cannot restart.
Keep guards and anti-kickback devices installed and functional during operation. Never reach into the cutting area to feel for heat, clear a jam, or guide a difficult board. Remove trapped stock only by the manufacturer’s procedure. Alignment measurements and adjustments belong with trained personnel using the machine’s specified references and tolerances.
Start with the blade: buildup, edge condition, and specification
Resin deposits can make a serviceable blade cut like a dull one
Pitch and compacted dust collect around tooth faces, gullets, and blade surfaces. Deposits increase friction and interfere with chip clearance. Heat can then promote further buildup, so a blade that initially cuts acceptably may begin leaving darker edges as production continues.
With the blade safely removed, inspect it under good lighting. Look for deposits near the cutting edges and packed material between teeth. Clean it using a product and method approved for the blade, including any coating and carbide brazing. Avoid aggressive scraping or unapproved chemicals that could damage the tooling.
Cleaning is a useful diagnostic step, but it does not restore a rounded cutting edge. Persistent burning after proper cleaning warrants checking sharpness and setup rather than repeating the cleaning process.
Dull or damaged teeth increase heat at the cut
A worn edge compresses and rubs wood instead of shearing it cleanly. Other signs include greater cutting resistance, increased motor load, fuzzy edges, or a change in cutting sound. Missing or chipped carbide can produce an uneven cut and deserves immediate attention.
Send questionable tooling for professional inspection and sharpening. Do not judge condition only by whether the tooth looks pointed: cutting-edge wear can be difficult to see without magnification. Cracks, damaged brazing, or a distorted plate require removal from service and specialist assessment.
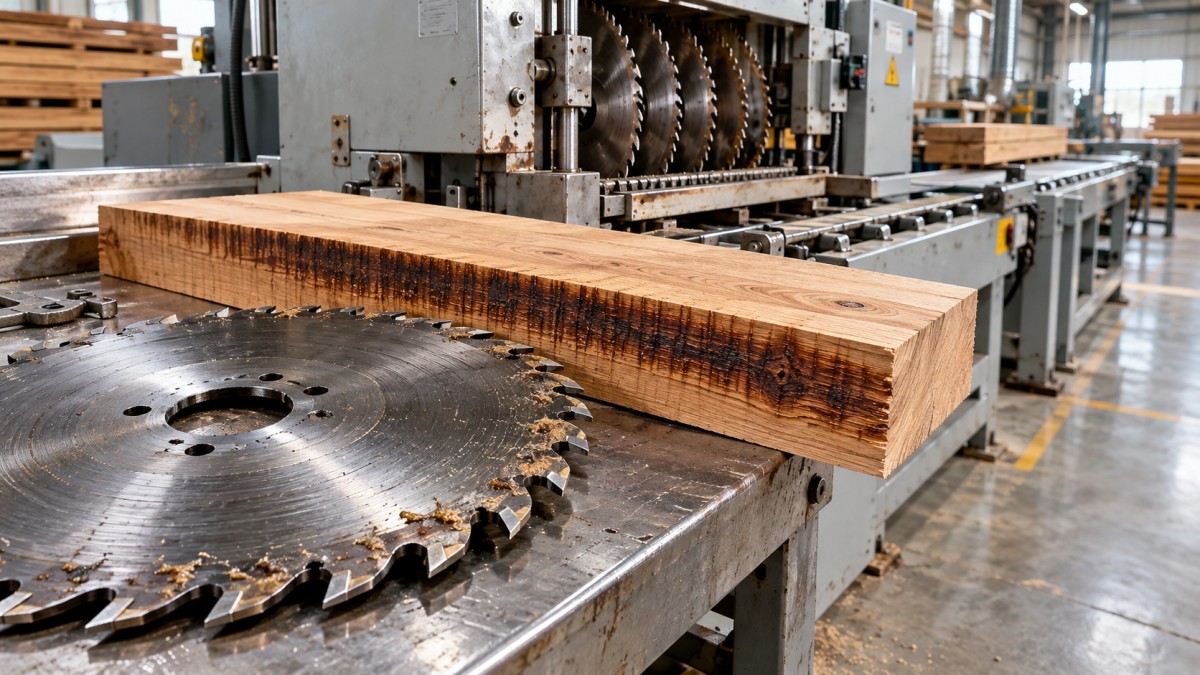
A blade that fits the arbor may still be wrong for the job
Hardwood ripping requires tooth geometry, gullet capacity, kerf, and plate stiffness suited to the material thickness and machine. A high-tooth-count finishing blade may have insufficient chip space for a demanding rip cut, creating heat even when sharp.
Use the saw and tooling manufacturers’ recommendations to match the blade to:
- The hardwood species and thickness range.
- The permitted diameter, bore, speed rating, and rotation direction.
- The machine’s feed range, spindle power, and mounting arrangement.
- Any fitted splitter or riving knife, whose thickness must be compatible with the blade plate and kerf.
A thin kerf is not automatically a cure for burning. Reduced cutting resistance may help some applications, but insufficient plate stiffness can allow deflection. Set blade projection according to the machine and blade instructions rather than applying a universal height rule.
Check actual feeding, not just the displayed feed speed
Slow feeding can cause burning because the teeth contact each section of wood repeatedly while removing too little material per tooth. At the opposite extreme, excessive feed can overload the cut, pack gullets, deflect the blade, or cause the drive system to struggle. The useful operating range depends on blade geometry, spindle speed, stock thickness, species, and machine capacity.
Do not respond by simply turning up the feed control. First establish that the blade is clean, sharp, and suitable. Then use the approved operating range and make controlled adjustments on representative stock, observing edge quality, feed stability, and machine load indicators.
On a powered-feed rip saw, the selected speed and the board’s actual movement may differ. A slipping feed chain or rollers, contaminated contact surfaces, incorrect pressure settings, or poor stock support can create hesitation while the drive continues running. Localized scorching may therefore be a feed-system issue rather than a speed-selection issue.
Inspect feed components and pressure devices under isolation, following the maintenance instructions. Excessive pressure can create drag; insufficient pressure may allow slipping or sideways movement. Do not compensate for worn components by tightening pressure settings beyond specification. Long or heavy boards also need approved infeed and outfeed support so their weight does not disturb tracking.
When the blade rubs after the teeth have passed
The cutting teeth create clearance for the blade plate. If the stock path and cutting plane are not correctly related, or the blade moves sideways, the plate or rear teeth can rub the newly cut edge. This often produces persistent burning that does not disappear after sharpening.
Relevant checks include the feed path, guide or fence alignment where fitted, spindle condition, blade runout, and the position of any splitter or riving knife. Use the equipment manufacturer’s alignment method; generic table-saw advice about altering fence angles may be unsuitable for an industrial chain-feed machine.
Blade mounting deserves attention when the problem starts immediately after a change. Debris, resin, or damage on the arbor seating surfaces and flanges can prevent correct seating. Incorrect clamping can also affect running accuracy. Clean and assemble these parts only as instructed, using the specified tightening method.
A newly sharpened blade that still burns consistently is a reason to measure, not keep increasing feed. Qualified maintenance personnel should distinguish blade runout from spindle or flange faults. Measurements must be made with the machine safely isolated; never hold a gauge or improvised pointer near a running blade.
Some boards close the kerf around the blade
Hardwood can contain growth stresses or drying stresses that are released during ripping. The two sections may move inward and pinch the blade, even when the tooling and alignment are correct. Bowed or twisted stock can create a similar symptom by changing how it contacts the feed system.
Suspect a material-related cause when burning is intermittent, freshly cut strips bend, or certain boards bind while comparable straight stock cuts normally. These clues do not establish a moisture diagnosis on their own. A moisture meter can help identify variation, but species settings, measurement depth, and instrument limitations matter.
Separate suspect material rather than forcing it through. Review stock preparation, moisture condition, support, and the approved ripping sequence. Some material may need a revised machining allowance or a staged process established by the workshop’s technical lead. Severely distorted or unstable pieces may be unsuitable for the setup.
Where the machine uses a splitter or riving knife, verify its condition, compatibility, and alignment. Such devices help manage kerf closure but do not eliminate internal stress. Never remove a protective device to make a difficult board pass.
Verify the correction without hiding the original fault
Once the likely cause has been addressed, use a controlled trial rather than restarting an entire batch. Choose straight stock representative of production, with comparable species, thickness, and preparation. Restore all guards and safety devices before operation.
- Record the starting condition. Note the blade specification and condition, material, feed setting, and burn location.
- Change one relevant variable. Cleaning the blade or correcting a verified feed fault gives a clearer result than changing several unrelated settings.
- Inspect the stopped, safely discharged workpiece. Check for discoloration, roughness, washboard marks, and variation along the edge. Observe machine load and feeding behavior from the normal operating position.
- Confirm the result across representative pieces. One clean board does not establish that a fault affecting only certain stock has been corrected.
Check extraction performance as part of this work. Blocked passages or poor chip removal can worsen recutting and heat, although extraction alone will not correct dull teeth or misalignment. Clear blockages only under the required isolation procedure.
Escalate to maintenance or the tooling supplier when burning persists with suitable sharp tooling and stable feed, especially if accompanied by runout, vibration, abnormal spindle noise, or recurring one-sided marks. Provide the marked samples and operating notes. Those details help distinguish a tooling problem from a feed-path or spindle fault without relying on repeated trial-and-error adjustments.
Send Your Inquiry
We welcome your cooperation and we will develop with you.